前言
一、SpringMVC简介
1.MVC设计模式
经典MVC模式中,M是指业务模型,V是指用户界面,C则是控制器,使用MVC的目的是将M和V的实现代码分离,从而使同一个程序可以使用不同的表现形式。
M: 数据模型,提供要展示的数据,因此包含数据和行为,可以认为是领域模型或JavaBean组件(包含数据和行为),不过现在一般都分离开来:Value Object(数据Dao) 和 服务层(行为Service)。也就是该模型提供了模型数据查询和模型数据的状态更新等功能,包括数据和业务。 V: 负责进行模型的展示,一般就是我们见到的用户界面,客户想看到的东西。 C: 接收用户请求,委托给模型进行处理(状态改变),处理完毕后把返回的模型数据返回给视图,由视图负责展示。
2.SpringMVC
SpringMVC是属于Spring的一部分,如上图所示。 SpringMVC是一种基于Java,实现了Web MVC设计模式,请求驱动类型的轻量级Web框架,即使用了MVC架构模式的思想,将Web层进行职责解耦。基于请求驱动指的就是使用请求-响应模型,框架的目的就是帮助我们简化开发,SpringMVC也是要简化我们日常Web开发。
1.SpringMVC核心架构图
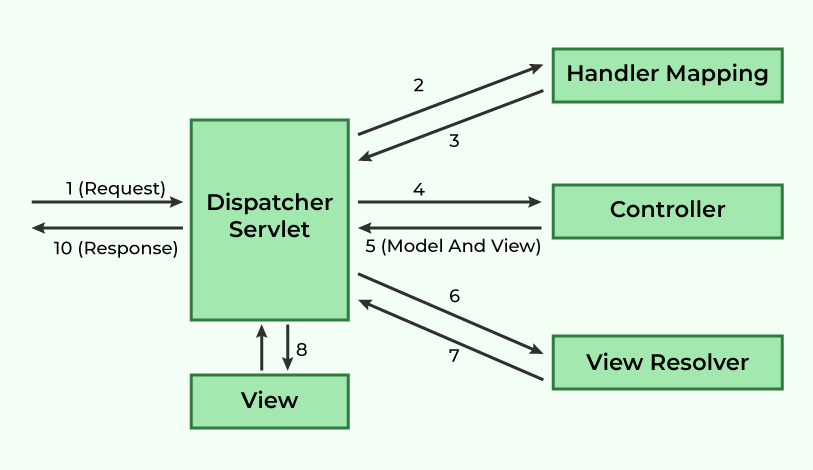
2.SpringMVC五大组件
| 组件 | 作用说明 |
|---|---|
| DispatcherServlet | 前端控制器(Front Controller),配置在 web.xml 中,负责拦截所有请求并统一分发到对应的 Controller 处理,是 Spring MVC 的核心入口。 |
| HandlerMapping | 处理器映射器,负责建立 请求 URL 与 Controller 的映射关系。DispatcherServlet 会从容器中获取所有 HandlerMapping,并找到能够处理当前请求的 Handler。 |
| Controller | 控制器,负责处理 DispatcherServlet 分发的请求,调用业务逻辑层处理数据,并将结果封装为 Model 返回给视图层。 |
| ModelAndView | 用于封装 模型数据(Model)和视图信息(View)。Controller 处理完业务后将数据放入 Model,并指定视图名称返回给框架。 |
| ViewResolver | 视图解析器,负责将逻辑视图名解析为具体的视图资源(如 JSP、HTML、Thymeleaf 模板等)。 |
客户端请求
↓
DispatcherServlet
↓
HandlerMapping(找到对应 Controller)
↓
Controller(处理业务)
↓
ModelAndView(封装数据 + 视图)
↓
ViewResolver(解析视图)
↓
View(JSP / HTML 等)
↓
返回响应
3.SpringMVC优缺点
优点:
- 灵活性强,Spring MVC的框架易扩展
- 有利于开发中的分工,提高开发效率
- 组件重用,有利于代码复用,重用性高
缺点:
- 不适合小型,中等规模的应用程序
- 增加系统结构和实现的复杂性
二、使用步骤
1.导入SpringMVC和Servlet坐标
<dependency>
    <groupId>javax.servlet</groupId>
    <artifactId>javax.servlet-api</artifactId>
    <version>3.1.0</version>
    <scope>provided</scope>
</dependency>
<dependency>
<groupId>org.springframework</groupId>
<artifactId>spring-webmvc</artifactId>
<version>5.2.10.RELEASE</version>
</dependency>
2.创建SpringMVC控制类
package com.hewen.controller;

import org.springframework.stereotype.Controller;
import org.springframework.web.bind.annotation.RequestMapping;
import org.springframework.web.bind.annotation.ResponseBody;

//定义表现层控制器bean
@Controller
public class UserController {

    //设置映射路径为/save,即外部访问路径
    @RequestMapping("/save")
    //设置当前操作返回结果为指定json数据(本质上是一个字符串信息)
    @ResponseBody
    public String save(){
        System.out.println("user save ...");
        return "{'info':'springmvc'}";
    }

    //设置映射路径为/delete,即外部访问路径
    @RequestMapping("/delete")
    @ResponseBody
    public String delete(){
        System.out.println("user delete ...");
        return "{'info':'springmvc'}";
    }
}
用户发哪个请求可以调用这个方法呢,就需要用 @RequestMapping() 注解。由于返回的是为String类型的json数据,所以还需要@ResponseBody置当前操作返回结果为指定json数据
3.初始化SpringMVC环境,加载bean
package com.hewen.config;

import org.springframework.context.annotation.ComponentScan;
import org.springframework.context.annotation.Configuration;

//springmvc配置类,本质上还是一个spring配置类
@Configuration
@ComponentScan("com.hewen.controller")
public class SpringMvcConfig {
}
4.初始化Servlet容器,加载SpringMVC环境,并设置技术处理请求
为了启动服务器可以加载SpringMvcConfig,需要定义一个Servlet容器启动的配置类。继承 AbstractDispatcherServletInitializer并覆盖里面的三个方法。
- createServletApplicationContext() 加载SpringMVC配置类
- getServletMappings() 设置springmvc控制器处理的请求映射路径
- createRootApplicationContext() 加载spring配置类
package com.hewen.config;

import org.springframework.web.context.WebApplicationContext;
import org.springframework.web.context.support.AnnotationConfigWebApplicationContext;
import org.springframework.web.servlet.support.AbstractDispatcherServletInitializer;

//web容器配置类
public class ServletContainersInitConfig extends AbstractDispatcherServletInitializer {
    //加载springmvc配置类,产生springmvc容器(本质还是spring容器)
    protected WebApplicationContext createServletApplicationContext() {
        //初始化WebApplicationContext对象
        AnnotationConfigWebApplicationContext ctx = new AnnotationConfigWebApplicationContext();
        //加载指定配置类
        ctx.register(SpringMvcConfig.class);
        return ctx;
    }

    //设置由springmvc控制器处理的请求映射路径
    protected String[] getServletMappings() {
        return new String[]{"/"};
    }

    //加载spring配置类
    protected WebApplicationContext createRootApplicationContext() {
        return null;
    }
}
通过查看AbstractDispatcherServletInitializer的结构可以看到它有一个子类AbstractAnnotationConfigDispatcherServletInitializer,通过继承它就可以使配置变得简单。
package com.hewen.config;

import org.springframework.web.servlet.support.AbstractAnnotationConfigDispatcherServletInitializer;

//web配置类简化开发,仅设置配置类类名即可
public class ServletContainersInitConfig extends AbstractAnnotationConfigDispatcherServletInitializer {

    protected Class<?>[] getRootConfigClasses() {
        return new Class[]{SpringConfig.class};
    }

    protected Class<?>[] getServletConfigClasses() {
        return new Class[]{SpringMvcConfig.class};
    }

    protected String[] getServletMappings() {
        return new String[]{"/"};
    }
}
四、工作流程
启动服务器初始化过程
-
服务器启动,执行ServletContainersInitConfig类,初始化web容器
-
执行createServletApplicationContext方法,创建WebApplicationContext对象
-
加载SpringMvcConfig
-
执行@componentScan加载对应的bean
-
加载UserController,每个@RequestMapping的名称对应一个具体的方法
-
执行getServletMappings方法,定义所以的请求都通过SpringMVC
单次请求过程
-
发送请求locahost:8080/save
-
web容器发现所有请求都经过SpringMVC,将请求交给SpringMVC处理
-
解析请求路径/save
-
由/save匹配执行对应的方法save()
-
执行save()
-
检测到有@ResponseBody直接将save()方法返回值作为响应请求体返回给请求方
五、总结
@Controller
- 类型:类注解
- 位置:SpringMVC控制器类定义上方
- 作用: 设定SpringMVC的核心控制器bean
@RequestMapping
- 类型:方法注解
- 位置:SpringMVC控制器类定义上方
- 作用:设置当前控制器方法请求访问路径
@ResponseBody
- 类型:方法注解
- 位置:SpringMVC控制器类定义上方
- 作用:设置当前控制器方法响应内容为当前返回值,无需解析